

If you’re in your 20s or even 30s, sitting on the couch hunched over your laptop might be a comfortable way to work; however after working like that for ten years, you’ll likely find your back has become weak and rounded, your head craned perpetually forward, and the nerves in your arms, wrists, or hands often in pain.
After 15 years of computer work, I lost the ability to use a mouse without significant pain. I switched to a trackpad, which I can use with either hand, but after another decade, that can be painful as well. Nerve and tendon damage from 25 years of repetitive motion has caused a Repetitive Motion Injury (RMI), also referred to a Repetitive Stress Injury (RSI).
These types of injuries can cut into your productivity or worse—end your IT career prematurely. Fortunately for my livelihood, I’ve found ways to care for my body and still be productive. Now I take steps to minimize movement and ensure I have an ergonomic workspace. I also advocate for my coworkers, suggesting tweaks in procedure that minimize unnecessary movements and clicks.
A great way to do this is to learn common keyboard shortcuts. I answer technical support tickets everyday through ZenDesk, so I’ve also learned many of its keyboard shortcuts and I also use a handy Chrome extension called Vimium. (It’s also available in Safari and Firefox.) Using these two tools together have minimized my movement from keyboard to trackpad at least 80%! I can’t recommend it enough! Even if you don’t have an RSI, these shortcuts could help you prevent one from forming.
While it seems silly to think moving two or three inches from your keyboard to your mouse/trackpad and back again can cause so much pain in the long run, it’s actually quite serious. Sometimes those micro movements can cause more damage because of the precision needed, especially when trying to get your cursor to an exact spot.
Before I get to the keyboard shortcuts, I’d like to impart some advice for setting up your Apple trackpad. While repeatedly clicking the mouse with my right index finger caused some pain in my wrists and arms, having to depress the trackpad to click, quickly stressed my finger joints. The way around this is to configure your trackpad for tap-to-click, as well as all the Apple Gestures. They take some getting used to, but they are well worth learning. After a few days, your hands will be doing it on their own through muscle memory.
CONFIGURE TRACKPAD SETTINGS:
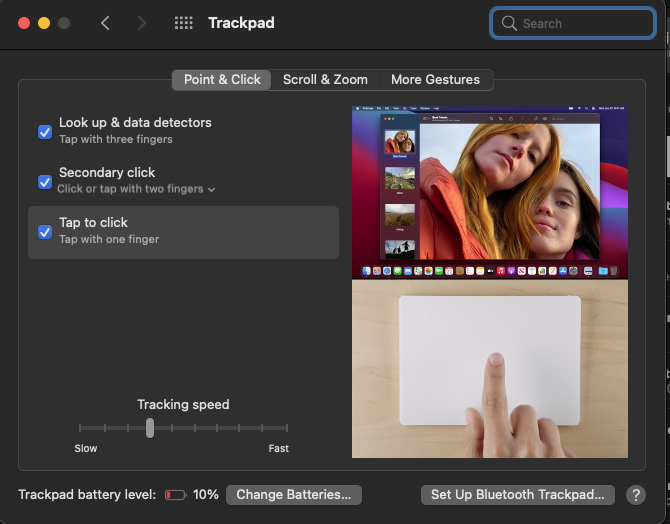
- Go the the Apple Menu in the top left of your screen and choose System Preferences.
- Click on the Trackpad icon to configure its settings.
- In the first tab called “Point & Click,” choose all of those shown, especially “Tap to click.” It will save your finger joints! There is an animated demonstration for each gesture on the right to help you learn how to use them.
4. On the middle tab called “Scroll & Zoom,” check all of these gestures, which will make dealing with images much easier on your hand. I prefer the “unnatural” scroll direction, so try it both ways to see which feels more comfortable to you.

5. Finally on the last tab called “More Gestures,” click all of these, too—and watch those animations on the right to learn how to use them. I use the “Swipe between pages,” “Swipe between full-screen apps,” and “Show Desktop” dozens of times every day.

Now…onto keyboard shortcuts!
COMMAND: YOUR BEST FRIEND
These keyboard shortcuts are outlined for the Apple Keyboard, but they’re similar for Windows (which would be CONTROL: YOUR BEST FRIEND). You can learn more about keyboard shortcuts for Windows machines here.
For the large majority of your most-used keyboard shortcuts on a Mac, you will be using the “command” key, which is indicated by this symbol: ⌘

- CUT / COPY / PASTE: Three of the most used commands when doing just about anything on the computer, and they’re so easy to key with just your left hand. They are, respectively, ⌘X, ⌘C, and ⌘V. (Although I show these as capitol letters for visibility, you need not use the shift key unless you see the ⇧ key, as in the next example.)
- There’s one more shortcut combination in that lower left row, and that’s the UNDO and REDO shortcuts, which are ⌘Z and ⌘⇧Z.
- HIGHLIGHT an entire document simply with ⌘A, then you can cut, copy, or paste with your new shortcuts from #1.
- For text formatting, these three shortcuts are essential. BOLD = ⌘B, ITALICS = ⌘I, and UNDERLINE = ⌘U.
- PRINT (⌘P) opens the print dialog window.
- When in virtually every application, these shortcuts apply:
a. NEW (page or browser window) ⌘N
b. OPEN file ⌘O, which opens your Finder navigation - NAVIGATE within text, including highlighting, with ⌘ + ARROW KEYS, interspersed with OPTION (Opt), SHIFT (⇧), and CONTROL (Ctrl). You might already know that using the ARROW keys can take you left, right, up, and down one letter or line at a time, but now you will be able to navigate between full words, lines, paragraphs, and more!
a. Make your cursor jump to the end or beginning of a line: type ⌘ + Right/Left Arrow to go all the way to right or left. If you also hold the SHIFT key down, it will highlight the text for easy copy/paste or revision.
b. Move your cursor to the top or bottom of the page: type ⌘ + Up/Down Arrow to go all the way to top or bottom. Again, adding the SHIFT key will highlight the text for easy copy/paste or revision.
c. Move your cursor one word at a time: Opt + Left/Right Arrow to jump over words, and add SHIFT to highlight.
d. Navigate your cursor between paragraphs: Opt + Up/Down Arrow to go all the way to top or bottom of the current paragraph. Add the SHIFT key to highlight the selection as well. - QUIT an application with ⌘Q.
- Browser Tabs: CLOSE a single browser tab with ⌘W. OPEN a single browser tab with ⌘T, and REOPEN the last closed browser tab with ⌘⇧T.
- To SAVE a document (which makes it easy to “save early and save often,” just key in ⌘S.
MY TOP 2 ZENDESK SHORTCUTS:
1. MACRO MENU—If you use macros in your ZenDesk, this one is the most helpful of all: Ctrl + Opt + M. This accesses the macro menu, from which you can search keywords to filter macros. Then a simple CMD(⌘) + Shift shows a preview of the macro, although there isn’t a way to apply the macro from there. No worries! Simply hit ESC to close the pop-up preview and then RETURN to apply the macro.
2. SUBMIT AS—I use this one as much as the macro shortcut, perhaps even more, as it’s necessary to submit each ticket in one of four ways: Pending, Open, Solved, or On Hold, and there is a shortcut for each.
a. PENDING = Ctrl + Opt + P
b. OPEN = Ctrl + Opt + O
c. SOLVED = Ctrl + Opt + S
d. ON HOLD = Ctrl + Opt + D
Find several more ZD helpful shortcuts in ZendDesk Help to best benefit your personal workflow.
That’s plenty for now! Just remember, a quick Google search will result in many more keyboard shortcuts for any application. Please use them to save your joints, nerves, and tendons.
Plus, on top of being better for your body, they will also make you faster and more productive!

Leave a comment